-
Showing posts with label nap time. Show all posts

22 February 2011

Spring Cleaning Week 1 {Kitchen}

I can't believe it is time to start already!
 But this week is a good week for me to start and not feel bad about missing anything, it is supposed to be cold and wet here anyway, and no school 1 day (I am sure our oldest would rather skip nap and help).


This is my list for the week (mostly during naptimes)

• Start Oven Cleaning

• Start Stove Top Cleaning

• Wash Curtains

• Dust/Vacuum Top of Cabinets

• Re-organize/Purge Cabinets and Clean shelves

• Polish Cabinets

• Clean Bottom of Microwave and Wash Filters

• Clean Out Fridge and Freezer

• Pull Oven Out and Clean Sides

• Clean Out Under the Sink

• Clean Inside of Dishwasher

• Make Vinegar Cubes

• Clean Toaster (finally gave in and got one) and Mixer

• Replace Furniture Felt

• Tidy Pantry

• Clean Pantry Door

• Vacuum and Steam Floors


WHEW! Lots to do this week but I have some fun stuff planned for the weekend if I get it all done!
And I am pretty sure there will be a few craft breaks too!


Continue Reading ...

03 December 2010

Organizing Friday!!

I can tell you that last Friday I didn't do ANY organizing.. I did shop myself into exhaustion though!! So today (well I actually started a little yesterday) I decided to figure out another option for the toys downstairs. There are a ton of books and toys down here and the set up we had going on just wasn't working anymore!
We have been using our closet downstairs to store ALL of the seasonal stuff and it is just overfull!!

And you can't tell from this picture, but this closet goes a ways back and around the corner.. FULL of bins. YIKES!
 Made some progress yesterday during nap time


I went through all the bins, all 14 or so of them, and made sure things were in the right bins, stuff that hasn't been used in years was taken out (for a few people and Goodwill) and sorted.
Decided to put the empty bins (Christmas stuff) and the next stuff I will be using in the side part of the closet.
Then Moved the shelf to the back, the kids are little, they don't have to duck yet!

We have a little moose hook that we have had in this closet since we first moved in but it doesn't work us where it is, the kids can't reach it and the hooks are too small for the adult stuff.
I think I will move it down and back so it is at there level and I don't have to mess with it anymore!

Today I got all the books and toys back in here and the front room is SO clean, amazing what a little organizing can do to another room!


I need to get a different bin to replace the one on the bottom that is too small for all their shoes, and I think we probably won't be keeping our shoes in there anymore, that empty bucket doesn't have another job right now.

Now this should work just fine for us.. but I am already making more plans, like seeing if I can get hubby to trim out the right side of the closet and paint the inside with chalkboard paint.. I am sure he will be so thrilled about his weekend (maybe next weekend) project!
And I am going to move that hook to the left side for the kids coats and backpacks, and I already have some hooks I got on clearance at Target to replace it for our jackets and bags!

I still love that there is plenty of room for all 3 kids to get in there and get the toys out but that they can be put away and hidden when it's time to wind down for the day!
Finnley realllly likes to play in there, kinda hard to get him out sometimes!


Continue Reading ...

30 August 2010

Halloween Silhouettes!

I wasn't going to do any Halloween posts until after the baby's first birthday but then some of my very favorite blogs are LOADED with them, too tempting! I have been working on 1 project, that I really like so far! Spooky Silhouettes! I like to do mostly black, white and silver Halloween stuff, these fit right in!
Here is what I did, pretty easy, and none of the steps take too long, just took me a few nap times.
~First I snagged some frames at Goodwill, and a garage sale.
~Spray painted black, left the silver ones the way they were.
~Found pictures online, copied to a zip drive and took it to the copy center. I did this because I don't feel like our printer prints REALLY black. I also brought the frames to make sure I sized them right for the frame.

~I really like Martha Stewart Glitter A LOT! I used a tiny glue pen and did this little witch and then covered with the black glitter, I did it in sections because the glue dries so fast. I didn't glitter all of them, just a couple

~Once it was dried I stuck it in the frame.

EASY, pretty inexpensive if you get a deal on the frames, or you have them already and not too scary.
 
But this one is my favorite! I didn't print it off, I used the cricut with the new Halloween mini Cartridge, October 31st. Cut the moon, covered with Martha's GLOW IN THE DARK Glitter, stuck it to some black cardstock, put it in the frame and thats it. I really like how not scary and just enough whimsical it is!!


This is them all together, I'm not happy with them yet. I have a few more that aren't finished, need to find the perfect silhouettes still! I want to add at least a few more, but considering it is still August, I'm not worried about running out of time!


These are in our living room, that we have done NOTHING to in 3 years, that's why it looks so plain!
Continue Reading ...

06 August 2010

Back to School Banner


Found this deck of "cards" at the craft store and knew right away I could do something with them! I think they are for scrapbooking, but I had other plans. I love the vintagey/retro simpleness of the shapes and the pictures! 

That was all I used.. plus some ribbon I forgot to put in the picture!
The cards
Package of eyelets
Hammer
Mat &
Ribbon

Then I just did eyelets in each corner, tied them together in the right order and hung it up. Pretty simple and not too time consuming. I would call it a naptime craft, but only if you have heavy sleepers, the hammer is a little loud!


Continue Reading ...

29 January 2010

Naptime Pantry Cleanout.2

Alright.. I got it all cleaned out and re organized! Like I said before I did do some prep before..had all my bags ready to go and the canisters were done.. cause they are a fun project, I couldn't wait so I did them last night!

I thought some canisters would be helpful, but I am not one to commit to a certain style or design so I got clear and figured I could change em up as much as I wanted! Target had the canisters and I like that they are square instead of round so they can snuggle right up to each other and not waste any space! They didn't have enough at our Target, but I am planning on going to the other side of town to get a few more big ones! I need one for cereal and oats! I also could not find a gingham plastic tablecloth at all yesterday! Went to a few different places and nothing! I was hoping to cover the shelves with them, like shelf liner but not stuck to the shelves. I am guessing as Spring and Summer approach they will be around more, I will take some more pics if I find some!

I know seeing someones before and after pics of a pantry aren't that interesting, but I wanted to share the canister labels I made, well I decoupaged them on after printing them off. Super easy! Can't wait to make some for the Laundry room too!


I had the punch in the scalloped edge circle so I just made the words on Microsoft works to fit the size and printed them on some scrap booking paper I had around.. Used the punch to punch them out, mod podge on top to seal the ink and then mod podge to the canister!

They were cute but I wanted them a little bit more fluffy! I just cut some coordinating ribbon to the paper in a few strips and tied them on with mini ric rac!

I did use 2 different papers for the labels SO I have a few extras, if anyone would use them I can mail em to whoever wants them! Just comment and I will get your address!
Maybe every Friday I should do a project like this! I'm sure it will make the day go by fast! I was surprised at how quiet it was during this task! I could still hear a few snores every once in a while, one of my favorite sounds!
Continue Reading ...

Nap Time Pantry Clean Up!

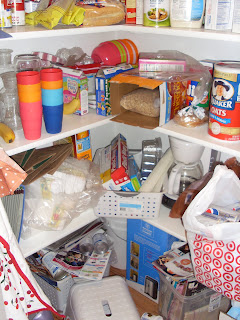
In an effort to get and stay organized our pantry needed a BIG makeover! Our pantry is also our office area, that's why there are office supplies and computer parts! Sad but here are the before pics..

Yeah it is bad! But since it is Friday I decided to get it taken care of during nap time today! I stopped by the Target clearance isle and picked up a couple things to help, along with some garbage bags! I also have a cute canister project to show off (as long as the kids nap)! Come check it out later today!


Continue Reading ...

19 August 2009

A Nap time Craft and a few little updates!

Inspired by the wreath that I have yet to order from Ballard Design.. I made a mini initial for our mini wreath on our porch.. kind of a year round wreath, nothing too seasonal. Just grapevine wreath but it needed something.. This is what I thought would work and SUPER cheap!I got the wooden letter at Michael's but have seen smaller ones at other stores.. under 2 bucks for this one! Headed to $ Tree for a bag of moss. Already had some tacky glue.. I am sure you can use whatever glue you have, spray glue would probably work.. and if I had more time I would have painted the "G" a green color instead of the white.. would have been easier! But I only had a nap time to do it all!

I broke up the moss a little bit so there was varying sizes of chunks to use.
Only glue a little section at a time.. learned THAT the hard way.
Attach enough moss and press down to cover the glue and the letter.. the further I got around the letter the better I got.. I went back and added more to where the white was still visible.. easy enough!


It took me less than a GOOD nap time to finish it. I am pretty happy with how it turned out and if I don't get the big wreath ordered I might consider a bigger one.. using a few layers of cardboard, but for now this is good. Once it's dry I will cut off some of the extra so you can tell it's a "G".. looks a little like a chubby C right now!


I have added a few more Back to School decorations too! ( Pictures SOON ) I was having a hard time with just plain school supplies and apples.. SO I added a owl or 2.. Owls are suppose to be smart right? I was hoping they would be more noticeable but Ramsey didn't notice it at all.. and he notices everything! I am burning some Yankee Brand Candles in Candied Apple which seems JUST right.. a little appleish and super sweet, but not cinnamon or spiced at all which reminds me too much of Fall. Still using and loving the Bath and Body Works "country Apple" in their wallflowers and anti bacterial soap! Got both for under $4 each when they were on sale.. went a little crazy stocking up!


We never got around to the moon sand project.. When I gave the kids the choice they wanted to dust instead! Love my kids! Who knew they would think dusting with "special" aka swiffer dusters was such a treat?!


OK these Apples are just from the craft store.. they are really light so I thought I could get Ryan to drill through them.. oops, cement in the middle.. but he did it anyway and I love it! You can see my little owl there too!


I am already kind of done with this back to school stuff.. I am REALLY ready for Halloween! Got some cutesy stuff at Real Deals and am antsy to get it out. I am really going to try VERY hard to wait until after the baby is born to put Halloween stuff out.. A entire week will fly by faster than it is now (I hope) once he gets here and I am hoping to be recovered enough to change it out between all things "baby"!
Continue Reading ...